
Can you remove a Jeep hardtop by yourself? Yes, with the right tools and technique, one person hardtop removal is achievable, though it’s significantly easier and safer with a second person or a specialized hoist.
Taking off your Jeep hardtop unlocks a world of open-air freedom. Whether you’re a seasoned off-roader or just want to enjoy a sunny day, knowing how to expertly remove and reinstall your Jeep hardtop is a valuable skill. This guide will walk you through the process for various Jeep models, focusing on making it as straightforward as possible. We’ll cover everything from the necessary tools to safe storage solutions.
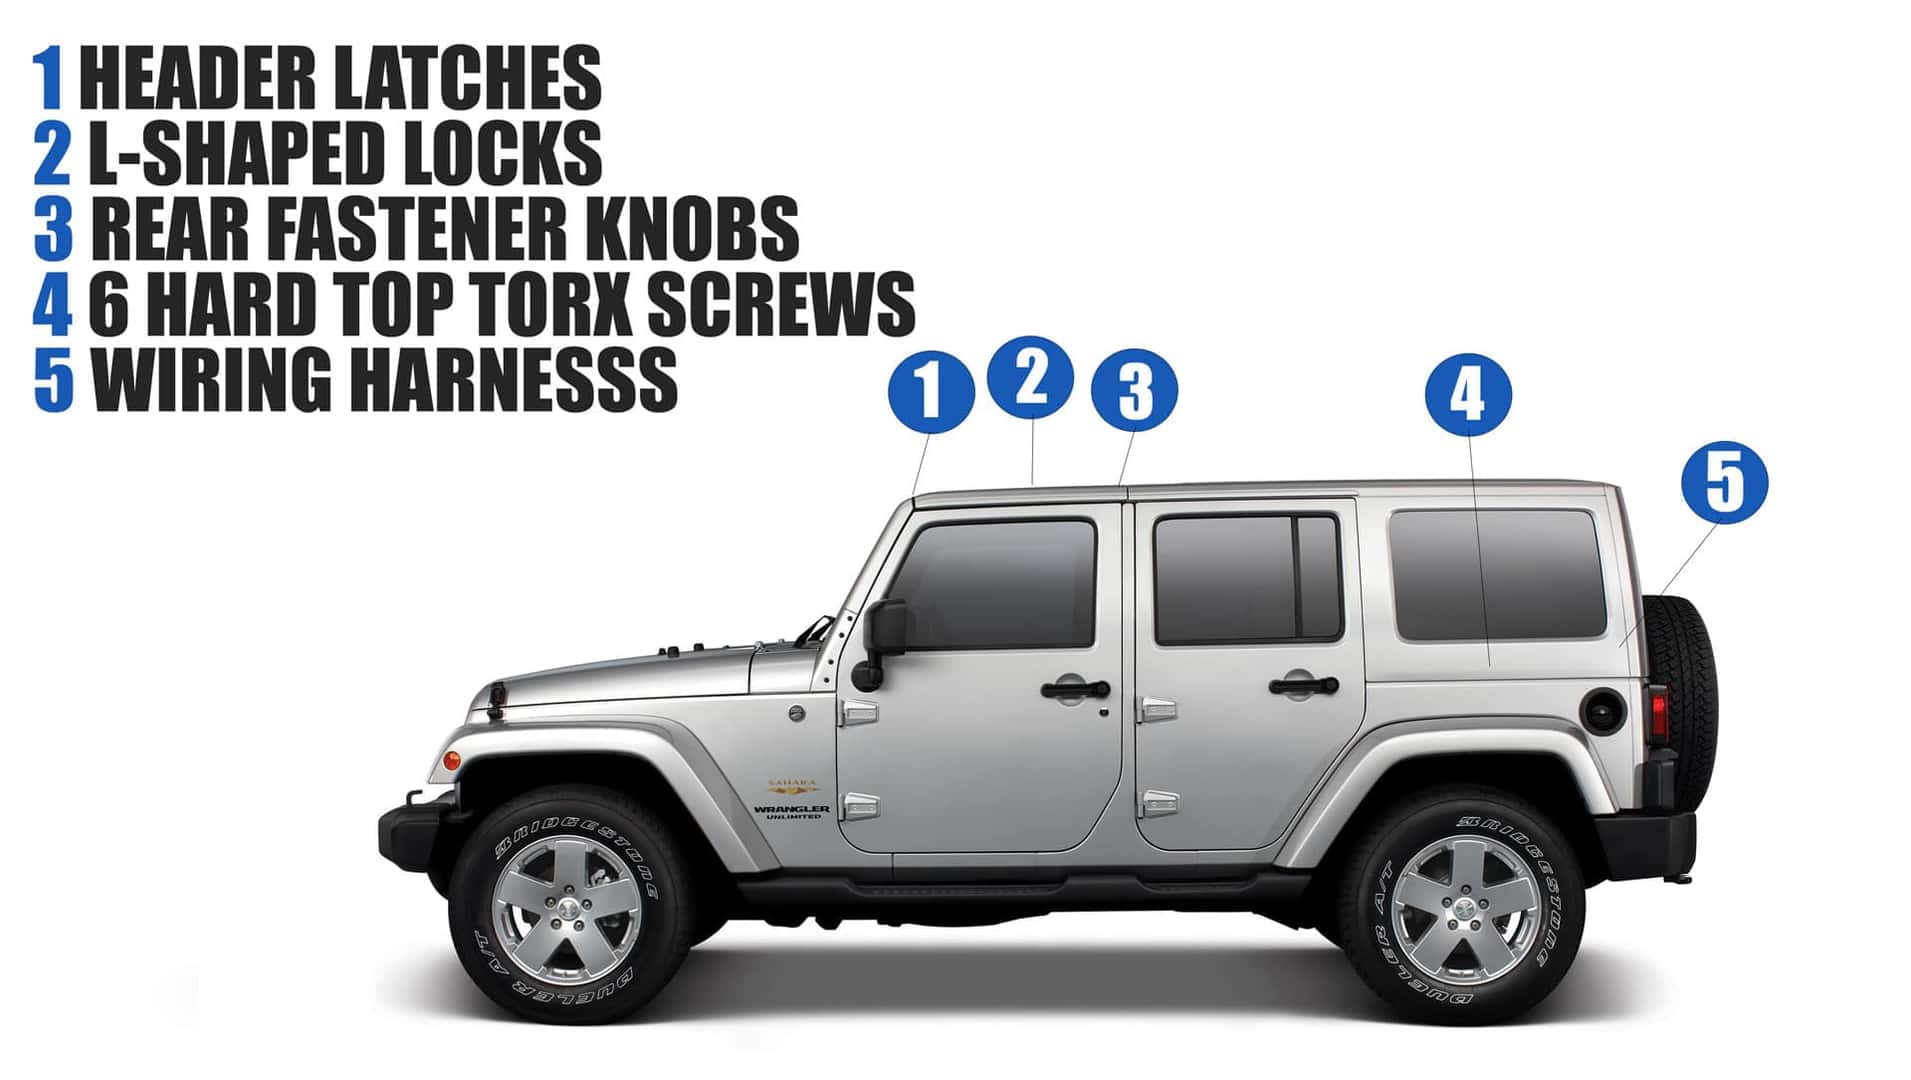
Image Source: di-uploads-development.dealerinspire.com
Why Remove Your Jeep Hardtop?
The iconic Jeep Wrangler, Jeep Gladiator, and their predecessors are renowned for their versatility. Removing the hardtop is a key part of this. Here are a few reasons why you might want to:
- Open-Air Experience: The most obvious reason! Enjoying the sun, wind, and sky is a classic Jeep pleasure.
- Cleaning and Maintenance: Accessing the interior for deep cleaning or inspecting the body and frame is much easier with the top off.
- Customization: Many owners remove the hardtop for painting, applying protective coatings, or installing aftermarket accessories.
- Winter Storage: Sometimes, removing the hardtop is necessary for fitting your Jeep into a tight garage space for winter storage.
Tools You’ll Need for Jeep Hardtop Removal
Having the right tools makes all the difference. Here’s a list of common items you’ll likely need for most Jeep Wrangler and Jeep JT hardtop removal jobs:
- Socket Wrench Set: You’ll need a set that includes various socket sizes, particularly for the bolts.
- Extension Bars: These are crucial for reaching recessed bolts.
- Torque Wrench: For proper reinstallation, a torque wrench is essential to avoid overtightening or undertightening the bolts.
- Trim Removal Tools: Plastic trim tools are best for prying away interior trim panels without scratching or damaging them.
- Phillips Head Screwdriver: For any interior screws holding trim in place.
- Flathead Screwdriver: Sometimes needed for clips or stubborn trim pieces.
- Gloves: To protect your hands from grease and sharp edges.
- Safety Glasses: Always protect your eyes, especially when working overhead or with potential debris.
- Helper (Recommended): While one person hardtop removal is possible, having an extra pair of hands makes lifting and maneuvering the heavy hardtop much safer and easier.
- Hardtop Hoist Jeep (Optional but Highly Recommended): For solo removal or easier lifting, a hardtop hoist is an excellent investment.
Preparing for Hardtop Removal
Before you start unbolting, a little preparation goes a long way.
1. Gather Your Tools
Lay out all the tools you’ll need. This prevents you from scrambling for something mid-process.
2. Clear the Interior
Remove any personal items, floor mats, or other obstructions from the Jeep’s interior that might get in the way or be damaged.
3. Open Doors and Windshield (If Applicable)
For some models, opening the doors can provide better access to certain bolts. If you have a JK or JL, you might need to open the doors to access side pillar bolts. For older models with removable windshields, ensure it’s secured properly if you’re opting for full removal.
4. Check the Weather
It’s best to remove your hardtop on a dry, calm day. Rain can make the process slippery, and wind can make handling the large, awkward hardtop dangerous.
Jeep Wrangler Hardtop Removal: Step-by-Step Guide
The process for removing a Jeep Wrangler hardtop is generally consistent across recent models like the Jeep JK and Jeep JL, with minor variations.
For Jeep JK (2007-2018)
The Jeep JK hardtop removal involves unbolting the top from the roll cage and the windshield frame, and disconnecting electrical components.
h4: Step 1: Locate and Remove Interior Trim
- Many of the bolts are hidden behind interior trim panels.
- Use your trim removal tools to carefully pry away the plastic panels along the B-pillars (the pillars between the front and rear doors) and the C-pillars (the rear pillars).
- Be gentle to avoid breaking clips. You’ll typically find clips and sometimes screws holding these in place.
h4: Step 2: Disconnect Electrical Connections
- Your JK hardtop likely has a rear wiper, defroster, and dome light.
- Locate the wiring harness connectors for these components. They are usually found along the rear of the hardtop or near the base of the pillars.
- Unplug these connections. They are typically simple push-and-pull connectors.
h4: Step 3: Remove the Front Header Bolts
- These bolts are located on the inside of the Jeep, above the windshield.
- You’ll need a socket wrench with an extension.
- Open the front doors to get better access.
- There are usually two bolts on each side, near the front corners of the hardtop.
h4: Step 4: Remove the Rear Side Bolts
- These are located on the outside, at the rear corners of the hardtop, where it meets the Jeep body.
- You’ll need to access these from the exterior, often near the tail lights.
h4: Step 5: Remove the C-Pillar Bolts
- These are crucial and often the most difficult to access. They are located where the hardtop meets the Jeep’s sport bar/roll cage.
- With the interior trim removed, you should see these bolts.
- You might need a longer extension or a flexible extension for your socket wrench to reach them.
- Sometimes, you might need to slightly lift the rear of the hardtop to relieve pressure and make removing these bolts easier.
h4: Step 6: Loosen the Tailgate Seal Bolts
- There are typically a few bolts along the rear edge of the hardtop that seal against the tailgate.
- These are usually easier to access and don’t require as much torque.
h4: Step 7: Lift and Remove the Hardtop
- This is where a second person or a hardtop hoist is invaluable.
- Once all bolts are removed, the hardtop should be free.
- Carefully coordinate with your helper to lift the hardtop straight up and away from the Jeep.
- If using a hoist, follow the hoist manufacturer’s instructions for safe detachment and lifting.
- Be mindful of the weight and awkwardness. Walk it clear and set it down on a stable, protected surface.
For Jeep JL (2018-Present)
The Jeep JL hardtop removal is very similar to the JK, with the primary difference being the specific location and number of bolts and some minor interior trim differences.
h4: Step 1: Locate and Remove Interior Trim
- Similar to the JK, you’ll need to remove interior trim panels to access the bolts.
- Pay attention to the B-pillars and the area around the rear quarter windows.
- Use plastic trim tools to carefully pry these panels away.
h4: Step 2: Disconnect Electrical Connections
- The JL also has electrical connections for rear wiper, defroster, and dome light.
- Locate and disconnect these wiring harnesses. They are usually found near the base of the rear pillars.
h4: Step 3: Remove the Front Header Bolts
- These are located on the inside, above the windshield.
- Open the doors for easier access.
- You’ll find bolts securing the front edge of the hardtop to the windshield frame.
h4: Step 4: Remove the Rear Bolts
- There are bolts securing the hardtop to the Jeep body at the rear. These are typically on the exterior.
h4: Step 5: Remove the Side Pillar Bolts
- These are located where the hardtop meets the Jeep’s roll cage.
- Access them after removing the interior trim panels on the C-pillars.
- Again, a longer extension or flexible socket extension may be needed.
h4: Step 6: Loosen Tailgate Seal Bolts
- Similar to the JK, there are bolts along the rear edge that seal against the tailgate.
- Loosen these carefully.
h4: Step 7: Lift and Remove the Hardtop
- As with the JK, this is a two-person job or requires a hardtop hoist.
- Coordinate the lift, moving straight up and away.
- Be prepared for the weight and size. Set it down gently on a protected surface.
Jeep JT Hardtop Removal (Jeep Gladiator)
The Jeep JT hardtop removal shares many similarities with the Wrangler models but has some unique aspects due to the Gladiator’s longer wheelbase and truck bed. The Jeep JT hardtop is also typically a three-piece design, with a removable front panel.
h4: Step 1: Removing the Front Freedom Panels
- The Gladiator often features removable front panels (freedom panels) above the driver and passenger.
- These are usually secured by latches and sometimes a few small bolts or screws at the rear.
- Simply flip the latches forward and lift the panels out. Store them safely.
h4: Step 2: Disconnect Electricals
- Locate and disconnect wiring for any rear defroster, wiper, or dome lights. These are usually found near the rear of the cabin area.
h4: Step 3: Remove Front Header Bolts
- These bolts secure the front of the hardtop to the windshield frame, similar to the Wrangler. Open the doors for access.
h4: Step 4: Remove Side Pillar Bolts
- Access these bolts after removing interior trim panels on the B and C pillars. They connect the hardtop to the Jeep’s roll cage.
h4: Step 5: Remove Rear Tailgate Seal Bolts
- Locate and remove the bolts that seal the hardtop to the tailgate area.
h4: Step 6: Consider the Bed Mounts
- The JT hardtop might have additional mounting points or seals where it meets the truck bed. Inspect these areas for any specific bolts or clamps.
h4: Step 7: Lift and Remove the Hardtop
- This is a two-person job or requires a hardtop hoist. The JT hardtop is substantial.
- Carefully lift straight up and away from the vehicle.
- Ensure you have a clear path and a stable place to set it down.
Achieving One Person Hardtop Removal
While not recommended for everyone or every time, one person hardtop removal is possible with the right equipment and careful planning.
- Hardtop Hoist: This is the most effective tool for solo removal. A hoist system uses pulleys and straps to lift the hardtop safely and smoothly, allowing you to lower it directly into storage. There are various types, from ceiling-mounted to free-standing units.
- Specialized Dollies/Carts: Some aftermarket products are designed to help support and maneuver a hardtop once it’s partially lifted or detached, making it easier to slide or roll away.
- Strategic Use of Leverage: In some cases, you might be able to use a sturdy jack with a padded block to lift one side of the hardtop slightly, allowing you to inch it off. This requires extreme caution and a very stable setup.
- Practice and Preparation: If attempting solo, familiarize yourself with the bolt locations and the weight distribution. Clear your workspace completely.
Important Considerations for Solo Removal:
- Weight: Jeep hardtops are heavy and awkward. Risk of injury is significantly higher when working alone.
- Damage: Dropping or scraping the hardtop or your Jeep is a real possibility without adequate assistance.
- Balance: The hardtop can easily tip or become unbalanced, leading to damage or injury.
Reinstalling Your Jeep Hardtop
The Jeep hardtop installation process is essentially the reverse of removal.
1. Prepare the Sealing Surfaces
- Clean the rubber seals on the hardtop and the Jeep body. Ensure there’s no dirt or debris that could prevent a good seal.
2. Align and Position
- Carefully guide the hardtop back into position. This is where a helper or hoist is again invaluable.
- Start by aligning the front header bolts and the rear tailgate seal.
3. Install the Bolts
- Begin by hand-threading all the bolts to ensure they aren’t cross-threaded.
- Start with the front header bolts, then the side pillar bolts, and finally the rear bolts.
4. Torque the Bolts Properly
- Refer to your Jeep’s owner’s manual or reliable aftermarket resources for the correct torque specifications for each bolt.
- Using a torque wrench is crucial to ensure a secure fit without damaging the hardtop or the Jeep body. Overtightening can crack the fiberglass or strip the threads. Undertightening can lead to leaks and noise.
- A common sequence involves tightening the front header bolts first, then the side pillar bolts, and finally the rear tailgate bolts.
5. Reconnect Electricals
- Plug all electrical connectors back in securely.
6. Reinstall Interior Trim
- Once the hardtop is securely bolted down, carefully snap or screw the interior trim panels back into place.
7. Test Features
- Check the rear wiper, defroster, and dome light to ensure they are working correctly.
Hardtop Storage Jeep: Keeping Your Top Safe
Proper hardtop storage Jeep is crucial to prevent damage when it’s not on your vehicle.
Methods for Hardtop Storage:
- Hardtop Hoist: Many hoists can also be used for storage, allowing you to suspend the hardtop from the ceiling in your garage or shed. This keeps it out of the way and protected.
- Hardtop Stands/Carts: Specialized stands or carts are designed to support the hardtop securely, often on wheels for easy transport within your garage. They distribute the weight evenly.
- Wall-Mounted Racks: Heavy-duty wall racks can be used to store the hardtop vertically or horizontally, freeing up floor space.
- DIY Storage Solutions: You can build your own wooden stand or use thick blankets and cardboard on the floor, ensuring the hardtop is supported evenly and protected from impacts.
Tips for Safe Storage:
- Protect Surfaces: Always place the hardtop on a soft, protected surface like thick blankets, carpet remnants, or foam padding.
- Even Weight Distribution: Ensure the weight of the hardtop is distributed evenly to prevent warping or cracking. Avoid resting it on narrow edges.
- Secure it: If storing on a stand or rack, ensure it’s stable and won’t tip over.
- Cover It: Consider using a breathable cover to protect it from dust and debris.
- Store Indoors: If possible, store your hardtop indoors in a climate-controlled environment to protect it from extreme temperatures and moisture.
Common Jeep Hardtop Removal Issues and Solutions
Even with a guide, you might encounter some snags.
Stuck Bolts:
- Problem: Bolts are rusted or seized.
- Solution: Apply penetrating oil (like WD-40 or PB Blaster) to the bolt threads and let it sit for several hours or overnight. Use a breaker bar for extra leverage. If the bolt head starts to strip, use a bolt extractor.
Stripped Bolt Heads:
- Problem: The head of the bolt is rounded off.
- Solution: Use a bolt extractor socket, which bites into the damaged head. Alternatively, you can try hammering a slightly larger socket onto the head, or cutting a slot into the head with a Dremel to use a flathead screwdriver.
Difficulty Reaching Bolts:
- Problem: Bolts are in tight or recessed areas.
- Solution: Use extension bars of various lengths, a universal joint adapter, or a flexible socket extension.
Hardtop Not Sealing Properly After Reinstallation:
- Problem: Leaks or excessive wind noise.
- Solution: Double-check that all bolts are tightened to the correct torque. Ensure the rubber seals are clean and properly seated. Inspect the seals for any damage or wear. Sometimes, adjusting the tightness of the tailgate seal bolts can help.
Scratching Trim or Paint:
- Problem: Accidental damage during removal or installation.
- Solution: Always use plastic trim removal tools. When maneuvering the hardtop, use moving blankets or protective padding to prevent contact with the Jeep’s body.
Frequently Asked Questions (FAQ)
Q1: How much does a Jeep hardtop weigh?
A: A Jeep Wrangler hardtop typically weighs between 80-120 pounds. The Jeep JT hardtop can be heavier due to its size. Always check your specific model’s specifications.
Q2: Can I remove the Jeep hardtop in the rain?
A: It’s strongly advised against removing a Jeep hardtop in the rain. The top is heavy and awkward, and the wet surfaces increase the risk of slipping and dropping it, potentially causing damage or injury.
Q3: What are the Jeep hardtop bolts made of?
A: Jeep hardtop bolts are typically made of steel, often with a protective coating to resist corrosion. However, they can still rust over time, especially in areas with harsh weather conditions.
Q4: How often should I remove my Jeep hardtop?
A: There’s no set schedule. Remove it as often as you like for enjoyment, cleaning, or maintenance. Some owners remove theirs seasonally, while others only do it for specific trips or tasks.
Q5: Are all Jeep hardtops interchangeable?
A: No. While many JK and JL hardtops share similarities, they are not always interchangeable due to slight design differences in the mounting points and seals. Hardtops are specific to their model years and body styles. A Jeep JT hardtop is distinct from a Wrangler hardtop.
Q6: How can I make the Jeep hardtop removal easier?
A: The best ways to make Jeep hardtop removal easier are to have a helper or invest in a hardtop hoist. Ensuring you have the correct tools, including extensions and quality sockets, also simplifies the process.
Q7: What if I damage my Jeep hardtop during removal?
A: Minor scratches can often be repaired with touch-up paint or detailing products. For larger cracks or damage, professional repair services or replacement hardtop panels might be necessary.
Q8: Is it difficult to put the Jeep hardtop back on?
A: Reinstalling the Jeep hardtop is similar in difficulty to removing it. Alignment can be tricky, and it requires careful handling. Again, a helper or hoist significantly simplifies the process.
Conclusion
Removing and reinstalling your Jeep hardtop is a rewarding DIY task that enhances the versatility of your vehicle. By following these detailed steps, gathering the right tools, and prioritizing safety, you can confidently tackle this process. Whether you’re aiming for one person hardtop removal with a hoist or coordinating with a friend, the open-air driving experience that awaits is well worth the effort. Remember to always consult your specific Jeep model’s manual for any unique instructions and to store your hardtop properly to ensure its longevity. Enjoy the freedom!