
What is a diaper jeep cake? A diaper jeep cake is a creative and practical centerpiece for a baby shower, made primarily from rolled diapers and designed to resemble a Jeep. Can I make a diaper jeep cake with just diapers? While diapers are the main component, you’ll also need various crafting supplies to assemble and decorate it. Who is a diaper jeep cake for? It’s perfect for celebrating an upcoming arrival, especially if the parents-to-be have a love for adventure or a specific theme in mind.
This guide will walk you through exactly how to make a diaper jeep cake, offering a fun and memorable DIY baby shower jeep cake that doubles as a useful gift. Forget complicated baking; this diaper cake tutorial focuses on assembly and decoration. You’ll be creating a fantastic diaper vehicle cake that guests will rave about. Let’s dive into this easy DIY diaper jeep project!
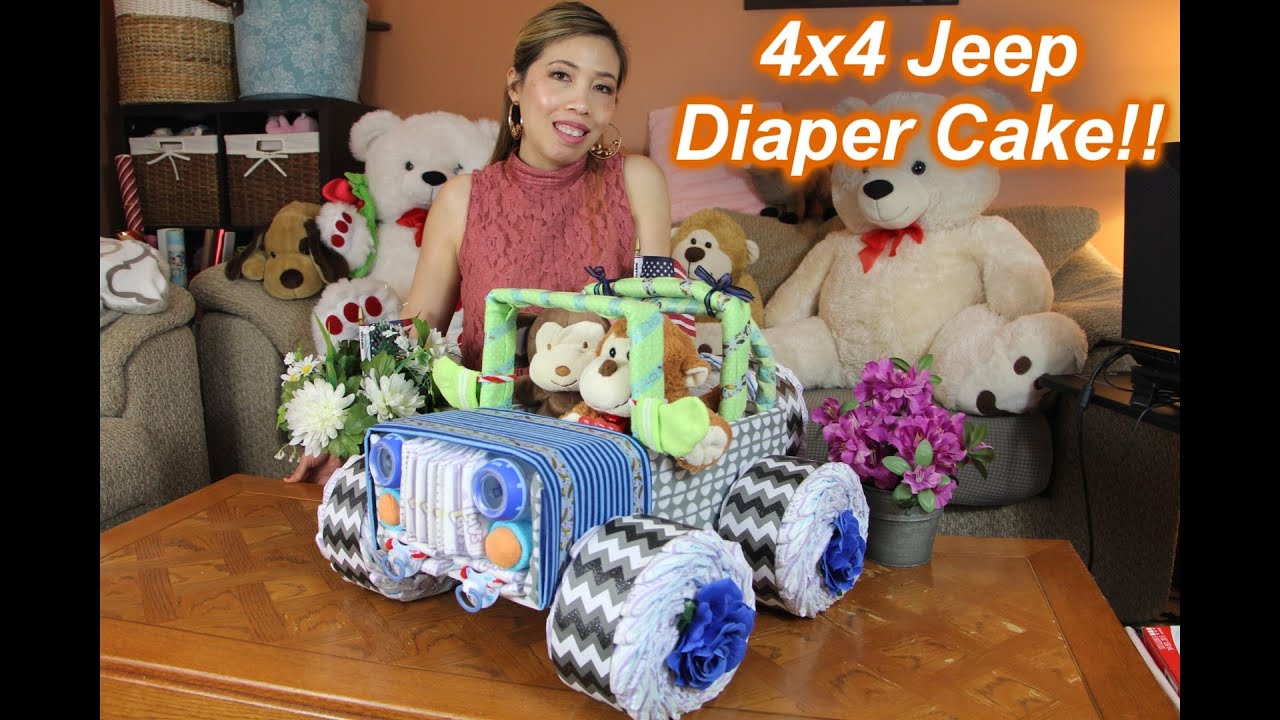
Image Source: i.ytimg.com
Why Choose a Diaper Jeep Cake?
A diaper jeep cake is a fantastic choice for several reasons:
- Unique and Memorable: It stands out from traditional diaper cakes.
- Practical Gift: It uses diapers, which new parents always need.
- Customizable: You can adapt the colors and decorations to match the baby’s nursery or shower theme.
- Photo Opportunity: It makes for adorable baby shower photos.
- Conversation Starter: It’s guaranteed to get compliments and spark conversations.
Materials Needed for Your Diaper Jeep Cake
Gathering your supplies is the first crucial step. Here’s a comprehensive list to help you build your diaper jeep cake:
Essential Diaper Supplies:
- Diapers: Approximately 40-60 newborn or size 1 diapers. You might need more or fewer depending on the size of your jeep and how tightly you roll them. It’s always good to have a few extra on hand.
- Rubber Bands: Various sizes, for holding rolled diapers together and for securing the layers.
- Baby Washcloths or Receiving Blankets: 2-4, to cover the “body” of the jeep and provide a base.
Crafting and Decorative Supplies:
- Cardboard or Foam Board: For creating the base and structural elements.
- Scissors or Craft Knife: For cutting cardboard.
- Hot Glue Gun and Glue Sticks: Essential for securing various components. Be careful when using!
- Ribbon: In colors that match your theme, for decorating the jeep.
- Baby Items for Decoration:
- Baby bottles (2-4) for headlights or wheels.
- Baby wipes container or small toy car for the steering wheel or dashboard.
- Baby socks or booties for decorations or accents.
- Pacifiers.
- Small baby toys.
- Washcloths or burp cloths in coordinating colors.
- Optional Decorations:
- Construction paper or cardstock for signs, license plates, or details.
- Baby washcloths or small towels to create a “seat” or other features.
- Stuffed animal (e.g., a teddy bear) to “drive” the jeep.
- Baby-safe paint if you wish to paint any cardboard elements.
Step-by-Step Diaper Jeep Cake Instructions
Follow these detailed diaper cake instructions to create your masterpiece. This diaper cake tutorial breaks down the process into manageable steps.
Step 1: Preparing the Diapers
This is the foundation of your diaper vehicle cake.
- Roll the Diapers: Take each diaper and roll it tightly from the waistline to the toe. Secure each rolled diaper with a small rubber band. Aim for consistent tightness and size for a neat appearance.
- Create Diaper Rolls for Wheels: Roll approximately 8-12 diapers extra tightly. These will be your jeep’s wheels. You can secure them with a slightly larger rubber band or wrap a ribbon around them for a cleaner look.
Step 2: Building the Jeep’s Base and Body
This is where your diaper jeep cake starts to take shape.
- The Base: Cut a sturdy piece of cardboard or foam board into a rectangular or oval shape. This will be the base of your jeep and will help support the weight.
- Forming the First Layer: Arrange 10-15 rolled diapers around the outer edge of your cardboard base. Secure them together using a large rubber band, or by carefully applying hot glue between the diapers. You can also use a large rubber band wrapped around the entire circle of diapers to hold them in place. This forms the bottom “ring” of your jeep.
- Creating the Second Layer: On top of the first layer, place another ring of rolled diapers (around 8-12 diapers). Secure this layer with a rubber band or hot glue. This layer will be slightly smaller in diameter than the first.
- The Hood and Trunk: For the front (hood) and back (trunk) of the jeep, you can create slightly raised platforms using more rolled diapers or by forming smaller tiers. You might roll 4-6 diapers together and secure them with a rubber band to create these shapes.
Step 3: Assembling the Jeep Structure
Now we’ll connect the major parts.
- Attaching Wheels: Use hot glue to attach your prepared diaper wheels to the sides of the first diaper layer. You’ll need four wheels.
- Forming the “Cabin”: For the main body of the jeep, you’ll essentially be creating a rectangular or slightly rounded structure. You can achieve this by arranging rolled diapers in a more linear fashion and securing them with rubber bands. Think of building up sides.
- Method 1 (Stacked Layers): Continue stacking layers of rolled diapers, each layer slightly smaller than the one below, to create a tiered effect that resembles the jeep’s body. Use rubber bands to hold each layer together. You can then use hot glue to secure these layers to the base and to each other.
- Method 2 (Wrapped Base): Use a large baby washcloth or receiving blanket to wrap around the base diaper layer. Secure the blanket tightly with rubber bands or by carefully pinning it underneath. Then, build up your subsequent layers on top of this. This adds a softer, more finished look.
- Adding the “Hood” and “Trunk”: Attach your prepared diaper rolls (the shorter, tighter rolls) to the front and back of your main body structure using hot glue.
Step 4: Adding Jeep Details and Decorations
This is where your creative diaper cake designs shine! This step is key to making it a true baby shower jeep cake.
- Headlights: Use two baby bottles or round toy items. Secure them to the front of the jeep using hot glue. You can wrap blue or white ribbon around them to resemble light.
- Grille: You can create a grille using strips of ribbon, thin rolls of diapers, or even black construction paper cut into strips. Glue these onto the front, between the headlights.
- Windshield: Drape a baby washcloth or a piece of clear cellophane over the front, creating a “windshield” effect. You can secure it with ribbon. Alternatively, you can use a piece of stiff cardstock cut into a windshield shape and decorated.
- Steering Wheel: Attach a small toy steering wheel or a baby wipe container lid to the “dashboard” area using hot glue.
- Seats: Use rolled washcloths or small folded baby blankets to create seats inside the jeep.
- Decorating with Ribbon: Wrap various colors and widths of ribbon around the layers of diapers, the wheels, and other parts of the jeep to add color and flair. Tie bows for extra decoration.
- License Plate: Cut a piece of cardstock into a license plate shape. Write “Baby [Last Name]” or a fun phrase like “On the Way!” and attach it to the back of the jeep.
- Adding Small Toys: Tuck small baby items like pacifiers, socks, or small plush toys into the jeep to fill it out and add more gifts.
- The Driver: Place a teddy bear or other stuffed animal in the driver’s seat to make it look like the jeep is ready for an adventure!
Step 5: Finishing Touches and Presentation
Almost there! This step ensures your diaper jeep cake is ready to impress.
- Secure Everything: Double-check that all components are securely attached. Add extra hot glue or rubber bands where needed.
- Base Decoration: Cover the cardboard base with a baby blanket, more ribbon, or decorative paper to hide the cardboard and complete the look.
- Final Inspection: Look at your creation from all angles. Make any last-minute adjustments to ensure it looks balanced and appealing.
Tips for Success with Your Diaper Jeep Cake
- Work on a Flat Surface: Ensure you have enough space to spread out your materials.
- Patience is Key: Rolling diapers and assembling can take time. Don’t rush the process.
- Use Quality Diapers: Sturdier diapers are easier to roll and hold their shape better.
- Consider the Theme: If the baby shower has a specific theme (e.g., woodland, nautical), adapt your decorations accordingly.
- Assemble Close to the Event: While sturdy, diaper cakes can sometimes shift if handled too much before the shower.
- Hot Glue Safety: Always be careful when using a hot glue gun. It’s best to have adult supervision if children are around.
- Diaper Size: Newborn diapers are good for a smaller jeep, while size 1 or 2 can create a larger, more imposing vehicle.
Creative Diaper Cake Designs for Your Jeep
Beyond the basic jeep shape, you can get very creative:
- Jungle Jeep: Use green and brown ribbons, add small toy safari animals, and perhaps a stuffed monkey “driving.”
- Nautical Jeep: Use blue and white stripes, rope-like ribbon, and small toy boats or anchors.
- Camouflage Jeep: Use camouflage ribbon and natural-toned decorations.
- Race Car Jeep: Decorate with checkered flags and racing stripes.
- Diaper Fire Truck or Ambulance: While this guide focuses on the jeep, the same principles of building with rolled diapers can be applied to other vehicle shapes.
Frequently Asked Questions About Diaper Jeep Cakes
Here are some common questions that might arise when planning your DIY diaper jeep.
How many diapers do I need for a diaper jeep cake?
You will typically need between 40 to 60 diapers, depending on the size you want your jeep to be and how tightly you roll them. It’s always a good idea to have a few extra on hand.
Can I use different diaper sizes?
Yes, you can mix diaper sizes. Newborn diapers are good for a smaller jeep, while size 1 or 2 diapers can create a larger, more substantial vehicle. Ensure consistency within layers for a neater look.
How do I make the diaper jeep stable?
Stability comes from tightly rolling the diapers, using rubber bands effectively to secure layers, and employing hot glue judiciously at key connection points. A sturdy cardboard or foam board base is also crucial for support.
What if I don’t have a hot glue gun?
While hot glue is highly recommended for its quick bonding and strength, you can use strong double-sided tape or craft glue. However, these may not hold as securely or as quickly, potentially requiring longer drying times and careful handling during assembly.
Can I make a diaper jeep cake without baby bottles for headlights?
Absolutely! You can use large round buttons, small toy balls, rolled-up washcloths tied with ribbon, or even cut circles from colorful cardstock to serve as headlights.
How long does it take to make a diaper jeep cake?
The time can vary, but generally, it takes about 2-4 hours to complete a diaper jeep cake, depending on your crafting speed and the complexity of the decorations.
Can I personalize the diaper jeep cake?
Yes, personalization is one of the joys of making a diaper jeep cake! You can add a custom license plate, use the parents’ favorite colors, or incorporate elements related to their hobbies or interests.
Is this a good gift for a baby shower?
A diaper jeep cake is an excellent gift! It’s both a beautiful centerpiece and a very practical gift of diapers and other baby essentials.
How do I transport a finished diaper jeep cake?
Transporting a diaper jeep cake can be tricky. It’s best to assemble it at the venue if possible. If not, place it in a sturdy box or container with extra padding (like towels or blankets) to prevent it from shifting or falling apart during transport. Drive carefully!
This detailed guide provides a comprehensive overview of how to build a diaper jeep, ensuring your baby shower jeep cake is a standout centerpiece. With these diaper cake instructions and creative diaper cake designs, you’re well-equipped to create a memorable and functional gift. Enjoy the process of making this unique diaper vehicle cake!