
Can you remove a Jeep hardtop by yourself? Yes, with the right tools and a bit of planning, you can remove a Jeep hardtop solo, but having a helper makes it much easier and safer. This guide will walk you through the process for various Jeep models, ensuring a smooth and successful hardtop removal.
Whether you’re looking forward to the open-air experience of summer or need to access your Jeep for maintenance, knowing how to remove your hardtop is a valuable skill for any Jeep owner. This comprehensive guide covers everything you need to know, from the tools you’ll require to the best ways to store your hardtop once it’s off. We’ll focus on popular models like the Jeep Wrangler (including JK and JL generations), the Jeep Gladiator, and older models like the TJ and YJ.
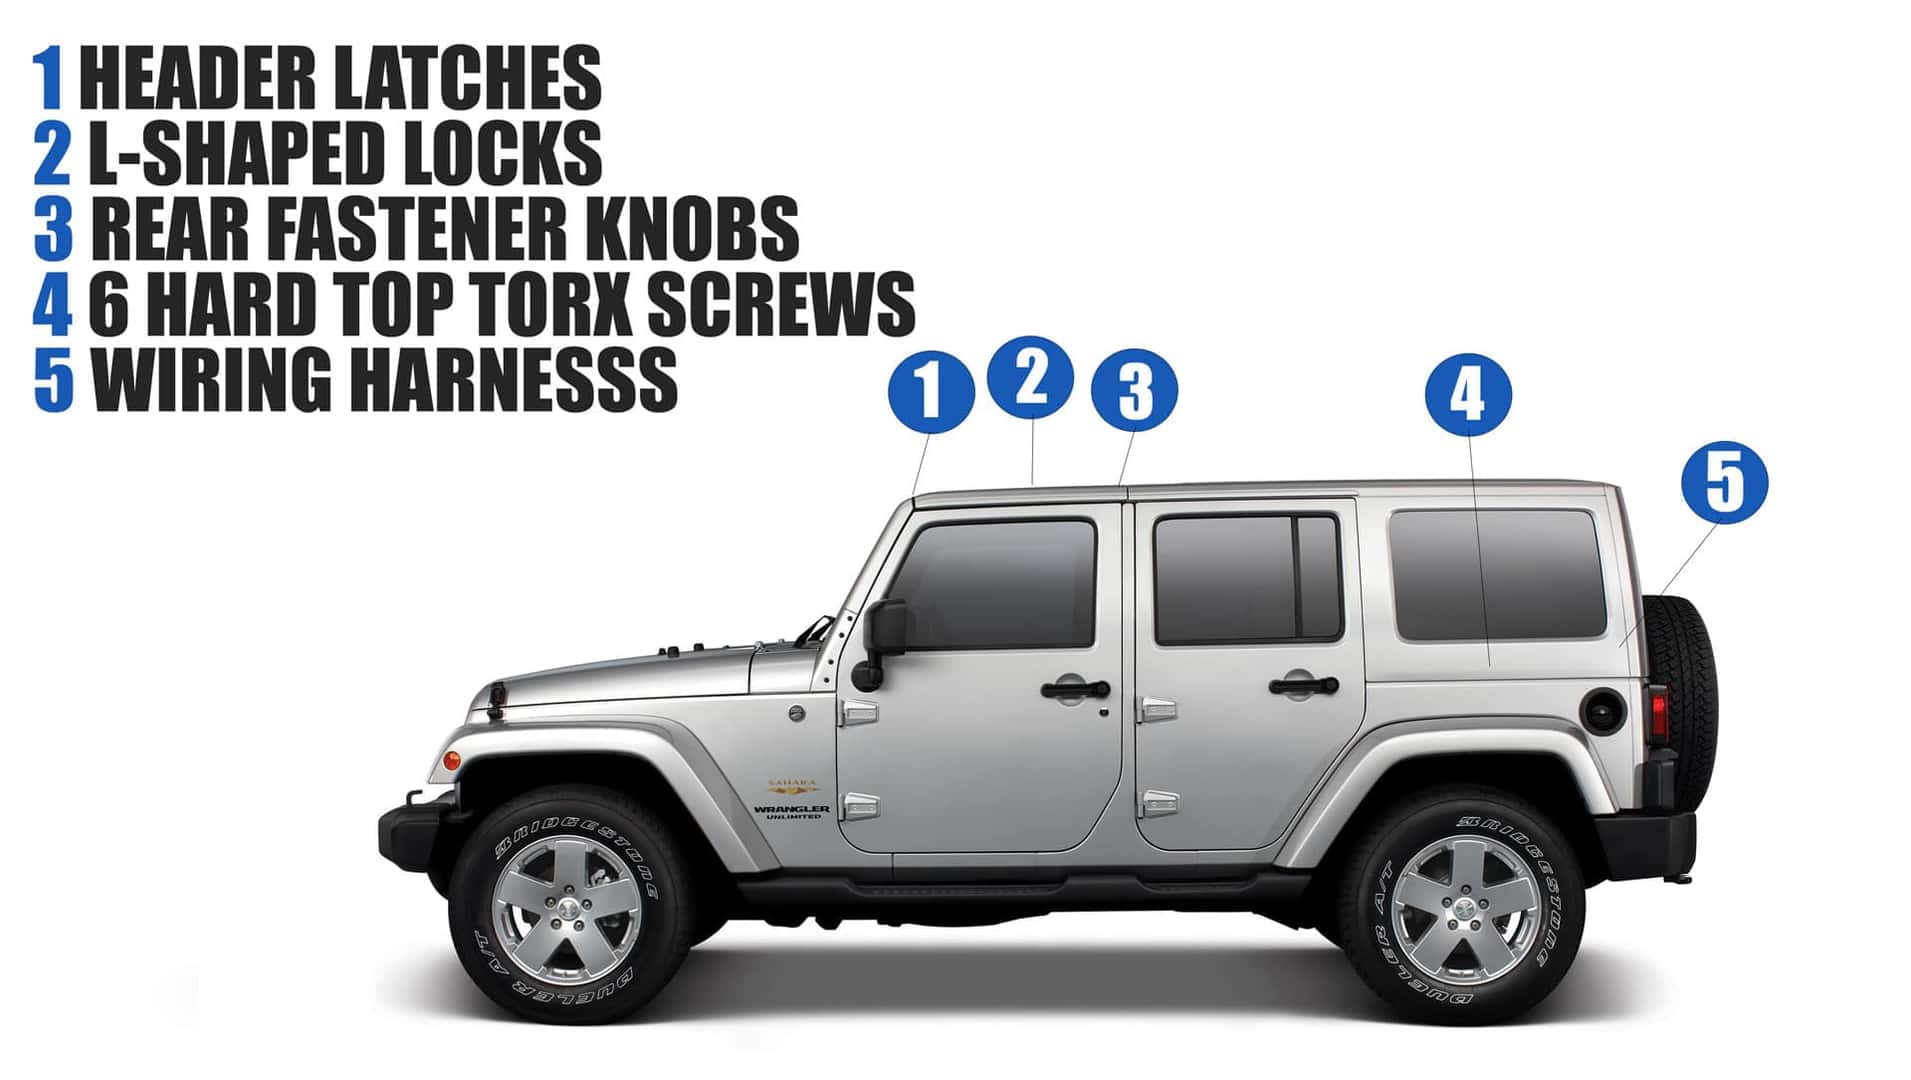
Image Source: di-uploads-development.dealerinspire.com
Getting Ready: Tools and Preparation
Before you start unscrewing, it’s crucial to gather the right tools and prepare your Jeep. This makes the process much smoother and prevents any damage.
Essential Tools for Hardtop Removal
The exact tools you need can vary slightly by Jeep model, but here’s a general list of what will be helpful:
- Socket Wrench Set: You’ll need sockets that fit the various bolts securing the hardtop. Common sizes include 10mm, 13mm, and 18mm, but check your specific model’s requirements.
- Torque Wrench: While not strictly necessary for removal, a torque wrench is essential for reinstallation to ensure bolts are tightened correctly, preventing leaks and damage.
- Extension Bars for Sockets: These help reach bolts in tight or recessed areas.
- Flathead Screwdriver or Pry Tool: Useful for gently prying trim pieces or releasing stubborn clips.
- Phillips Head Screwdriver: For any interior trim screws.
- Shop Rags or Towels: To protect your Jeep’s paint and interior from scratches.
- Gloves: To protect your hands.
- Safety Glasses: Essential for protecting your eyes from falling debris or tools.
- A Helper: Seriously, this is the most important “tool.” Trying to lift a heavy, awkward hardtop alone can lead to injury and damage.
Pre-Removal Checks and Cleaning
A little bit of preparation goes a long way:
- Clean Your Jeep: Wash your Jeep, especially around the edges of the hardtop where it meets the body. This prevents dirt and grit from scratching the paint during removal. Pay attention to the areas where the bolts are located.
- Check the Weather: Choose a dry, calm day for removal. Wind can make handling the hardtop dangerous, and rain can lead to water damage if the interior isn’t properly protected.
- Clear the Interior: Remove any loose items from the interior that could get in the way or be damaged.
The Step-by-Step Process: Jeep Hardtop Removal
The process generally involves releasing the latches, removing bolts, and then carefully lifting the hardtop off. We’ll break this down by model type.
Jeep Wrangler JK Hardtop Removal (2007-2018)
The Jeep JK Wrangler hardtop is a popular choice, and its removal is relatively straightforward.
Step 1: Release the Front Latches
- Locate the two large latches at the front of the hardtop, above the windshield.
- Pull down on the levers to release them. You might need to push them forward slightly first to disengage the locking mechanism. Some might be stiff, so a gentle wiggle can help.
Step 2: Remove Rear Clamps and Bolts
- Rear Clamps: Open the rear liftgate. Look for the clamps that secure the hardtop to the roll bar area. These are typically large plastic or metal pieces that pivot. Release these clamps.
- Rear Bolts: On the exterior, along the rear edge of the hardtop, you’ll find bolts. These often thread into captive nuts on the body tub. Carefully loosen and remove these bolts. You might need an extension bar to reach them.
- Side Bolts: On the sides of the hardtop, near the rear corners, there are usually bolts that go through the hardtop and into the Jeep’s body. Locate these and remove them.
Step 3: Disconnect Electrical Connectors (If Applicable)
- If your JK hardtop has features like rear defrosters or interior lights, you’ll need to disconnect the electrical wiring.
- Look for wiring harnesses tucked away, often near the rear corners of the hardtop where it meets the body. Carefully unplug these connectors. They usually have a tab you need to press to release.
Step 4: Lift and Remove the Hardtop
- With a helper, position yourselves on opposite sides of the Jeep, near the rear corners.
- Communicate clearly. One person should say “Ready?” and the other should reply “Ready.” Then, simultaneously lift straight up and away from the Jeep.
- The hardtop is heavy and awkward. Lift with your legs, not your back.
- Walk it carefully away from the Jeep to a safe, flat surface.
Jeep Wrangler JL Hardtop Removal (2018-Present)
The JL generation introduced some changes, including lighter-weight panels and slightly different latch systems.
Step 1: Release the Front Latches
- Similar to the JK, the JL has front latches above the windshield.
- Push down on the levers to unlatch them.
Step 2: Remove Rear Bolts and Wiring
- Rear Bolts: Open the rear liftgate. You’ll find bolts securing the rear of the hardtop to the body. These are usually located on the inside of the tub, just below the rear window. You’ll need your socket set.
- Side Bolts/Clips: Depending on the specific year and configuration, there might be additional bolts or clips along the sides. Inspect the edges where the hardtop meets the body.
- Electrical Connections: If you have rear wipers or defrosters, locate and disconnect the wiring harness. This is typically found on the driver’s side near the rear of the hardtop.
Step 3: Remove the Side Panels (Optional but Recommended)
- The JL hardtop can often be removed in sections. If you want to remove just the front Freedom Panels, you’ll typically release small levers inside the cabin above the doors.
- For a full hardtop removal, ensure all rear and side fastenings are undone.
Step 4: Lift and Remove the Hardtop
- With a helper, have one person on each side, preferably at the rear corners.
- Coordinate your lift. Lift straight up and away.
- The JL hardtop is designed to be somewhat lighter than previous generations, but it’s still a two-person job.
- Carefully place it in a secure location.
Jeep Gladiator JT Hardtop Removal
The Jeep Gladiator JT, being a pickup truck, has a slightly different hardtop design, particularly with its rear section.
Step 1: Remove the Rear Window
- On the Gladiator, the rear window is often a separate piece that needs to be removed first.
- Open the tailgate. Look for bolts along the bottom edge of the rear window where it meets the truck bed.
- There might also be wiring for the brake light or defroster. Disconnect these carefully.
- Once the bolts are out, the rear window can typically be lifted out. You might need to slide it upward or out.
Step 2: Release Front and Side Latches/Bolts
- Front Latches: Locate and release the latches above the windshield, similar to the Wrangler models.
- Side Bolts: There are usually bolts along the side edges of the hardtop where it meets the cab. Remove these.
Step 3: Disconnect Electricals
- Check for any wiring harnesses connected to the hardtop, especially if you have interior lights or other features. Disconnect these.
Step 4: Lift and Remove the Hardtop
- With a helper, carefully lift the hardtop off the Gladiator. It’s a substantial piece, so good communication and coordinated lifting are key.
Jeep TJ Wrangler Hardtop Removal (1997-2006)
The TJ generation has a robust hardtop that’s a bit more involved to remove.
Step 1: Remove Interior Trim
- The TJ hardtop is secured by bolts from the inside.
- You may need to remove some interior trim pieces, especially around the rear soundbar and the rear corners, to access all the bolts. Use your screwdrivers and pry tools carefully.
Step 2: Unlatch the Front
- The front of the TJ hardtop is secured by latches that hook onto the windshield frame.
- Release these latches. They often have a lever you pull or push.
Step 3: Remove the Bolts
- Rear Bolts: The most common bolts are located along the rear edge, accessible from inside the Jeep.
- Side Bolts: There are also bolts on the sides, often near the rear wheel wells, that go through the hardtop and into the body.
- Windshield Frame Bolts: Sometimes, there are bolts that connect the hardtop to the windshield frame itself, especially if you have a full hardtop. Check along the top of the windshield.
Step 4: Disconnect Wiring
- If your TJ has rear defrosters or dome lights, find and disconnect the electrical connectors. These are usually tucked away.
Step 5: Lift and Remove the Hardtop
- This is where a helper is essential. The TJ hardtop is heavy and bulky.
- Position yourselves at the rear corners.
- Lift straight up and away from the Jeep. Take your time and ensure a secure grip.
Jeep YJ Wrangler Hardtop Removal (1987-1995)
The YJ generation shares many similarities with the TJ in terms of hardtop removal.
Step 1: Locate and Remove Bolts
- The YJ hardtop is typically secured with bolts from the inside.
- Open the doors and the tailgate to access the bolts along the sides and rear.
- You might need to remove interior panels or trim to get to all of them. Common bolt locations include the rear corners, along the side of the body, and often near the roll bar.
- The front of the YJ hardtop usually latches onto the windshield frame, similar to the TJ.
Step 2: Release Front Latches
- Unlatch the front of the hardtop from the windshield frame.
Step 3: Disconnect Electricals (If Present)
- Check for any wiring harnesses for lights or other accessories and disconnect them.
Step 4: Lift and Remove the Hardtop
- With a helper, carefully lift the hardtop straight up and off the Jeep. This is a two-person job due to the weight and awkwardness.
Storing Your Jeep Hardtop
Once your hardtop is off, proper storage is key to protecting it and your Jeep.
Ideal Storage Solutions
- Hardtop Stand: Specialized stands are available that allow you to store the hardtop upright and safely. Many of these have wheels for easy moving.
- Wall-Mounted Hoist/Rack: For garages, a hoist system can lift the hardtop to the ceiling, freeing up floor space. These often use straps and a pulley system.
- Suspended Ceiling Rack: Similar to a hoist, a sturdy ceiling rack can hold the hardtop.
- On its Side (with Protection): If you must store it on its side, ensure the surface is protected with blankets or foam padding to prevent scratches. It should be leaning securely against a wall or other stable object.
What to Consider for Storage
- Protection from Elements: Store the hardtop in a dry, protected area, like a garage or shed. Exposure to rain, sun, and extreme temperatures can damage the seals and paint.
- Preventing Scratches: Always use protective padding (blankets, foam, pool noodles) anywhere the hardtop might touch a surface or itself.
- Securing the Hardtop: Ensure the hardtop is stable and won’t tip over. If using a stand or hoist, make sure it’s rated for the weight and securely fastened.
- Seals: When storing, it’s a good idea to place some sort of protection (like silicone spray or a specialized protectant) on the rubber seals to keep them from drying out and cracking.
Troubleshooting Common Issues
Even with careful preparation, you might encounter a few snags.
Stubborn Bolts
- Penetrating Oil: If bolts are rusted or difficult to turn, apply a penetrating oil (like WD-40 or PB Blaster) and let it sit for a while.
- Impact Wrench (Carefully): For very stubborn bolts, an impact wrench on a low setting might help, but be extremely careful not to strip the bolt head or damage the surrounding area.
- Heat (Use with Extreme Caution): In rare, severe cases, gentle heat from a heat gun (never an open flame) can help expand the metal and break the rust bond. Use this as a last resort and with extreme caution.
Leaky Seals
After reinstallation, if you notice leaks, check:
- Bolt Tightness: Ensure all bolts are tightened to the manufacturer’s specifications. Overtightening can damage seals, while undertightening can cause gaps.
- Seal Condition: Inspect the rubber seals for any damage, tears, or gaps. Replace any worn-out seals.
- Alignment: Make sure the hardtop is seated correctly and evenly on the body.
Frequently Asked Questions (FAQ)
Q1: How many people does it take to remove a Jeep hardtop?
A: While some lighter-weight hardtop panels on newer Jeeps can potentially be managed by one strong person, the full hardtop is a significant weight and awkward shape. For safety and ease, it is highly recommended to have at least two people for Jeep hardtop removal.
Q2: Can I remove the Jeep hardtop by myself?
A: It’s strongly advised against removing the entire Jeep hardtop by yourself. The hardtops are heavy, bulky, and difficult to maneuver alone, increasing the risk of injury to yourself or damage to the hardtop or your Jeep. Always have a helper.
Q3: What are the common Jeep hardtop bolts?
A: Common Jeep hardtop bolts are typically socket-head bolts. The sizes vary by model and year, but you’ll often find 10mm, 13mm, and sometimes 18mm sockets are needed. Always check your specific Jeep model for precise bolt sizes.
Q4: What are the typical Jeep hardtop latches?
A: Jeep hardtops commonly use lever-style latches, especially at the front, to secure the top to the windshield frame. These latches usually have a handle or lever that you flip down to secure and pull or push to release.
Q5: How should I store my Jeep hardtop?
A: Ideally, store your Jeep hardtop on a dedicated hardtop stand or using a wall-mounted Jeep hardtop hoist system in a dry, protected location like a garage. If storing on its side, ensure it’s well-padded and stable.
Q6: Do I need a Jeep hardtop hoist?
A: A Jeep hardtop hoist is not essential but is a very convenient and safe tool for removing, storing, and reinstalling your hardtop, especially if you frequently swap between hard and soft tops and have limited space or assistance.
Q7: What is involved in Jeep JK hardtop removal?
A: Jeep JK hardtop removal involves releasing two front latches above the windshield, removing rear bolts at the tailgate area, and side bolts near the rear corners. Electrical connections for defrosters or lights also need to be disconnected. Then, with a helper, the hardtop is lifted off.
Q8: What is the process for Jeep JL hardtop removal?
A: Jeep JL hardtop removal is similar to the JK, starting with front latches. It typically involves removing rear bolts from inside the tub, possibly some side fastenings, and disconnecting any wiring. The JL hardtop can sometimes be removed in sections (Freedom Panels) as well.
Q9: How do I remove the Jeep Gladiator hardtop?
A: To remove the Jeep Gladiator hardtop, you first typically need to remove the rear window by unbolting it from the bed. Then, release the front latches and remove any side bolts connecting the hardtop to the cab. Finally, lift the entire unit off with a helper.
Q10: What about Jeep TJ hardtop removal?
A: Jeep TJ hardtop removal requires removing interior trim to access bolts located inside the cabin, primarily at the rear and along the sides near the wheel wells. Front latches also need to be released, and electrical connections disconnected before lifting.
Q11: Is Jeep YJ hardtop removal significantly different?
A: Jeep YJ hardtop removal is quite similar to the TJ. It mainly involves locating and removing bolts from the interior, releasing front latches that secure to the windshield frame, and disconnecting any wiring.
Q12: Can I drive my Jeep without the hardtop?
A: Yes, you can drive your Jeep without the hardtop. However, ensure all electrical connections that are no longer needed are safely secured or covered to prevent damage from the elements. You may also want to consider a soft top or a tonneau cover for protection.
Conclusion
Removing your Jeep hardtop can seem daunting at first, but with this step-by-step guide, the process becomes manageable. Remember that preparation, the right tools, and always having a helper are the keys to a safe and successful removal. Enjoy the freedom of the open air and happy trails!