
What is a diaper Jeep? A diaper Jeep is a creative and functional gift made from rolled diapers and other baby essentials, assembled to resemble a Jeep vehicle. Can I make one for a baby shower? Absolutely! It’s a fantastic and memorable addition to baby shower gift ideas and a wonderful way to present practical items in a fun way.
Creating a diaper vehicle like a Jeep is a popular and enjoyable DIY project, perfect for new parents-to-be. It’s a unique alternative to traditional diaper cake recipes and offers a touch of whimsy and personalization. This guide will walk you through everything you need to know to build your very own diaper Jeep, turning essential baby supplies into a delightful baby shower centerpiece.
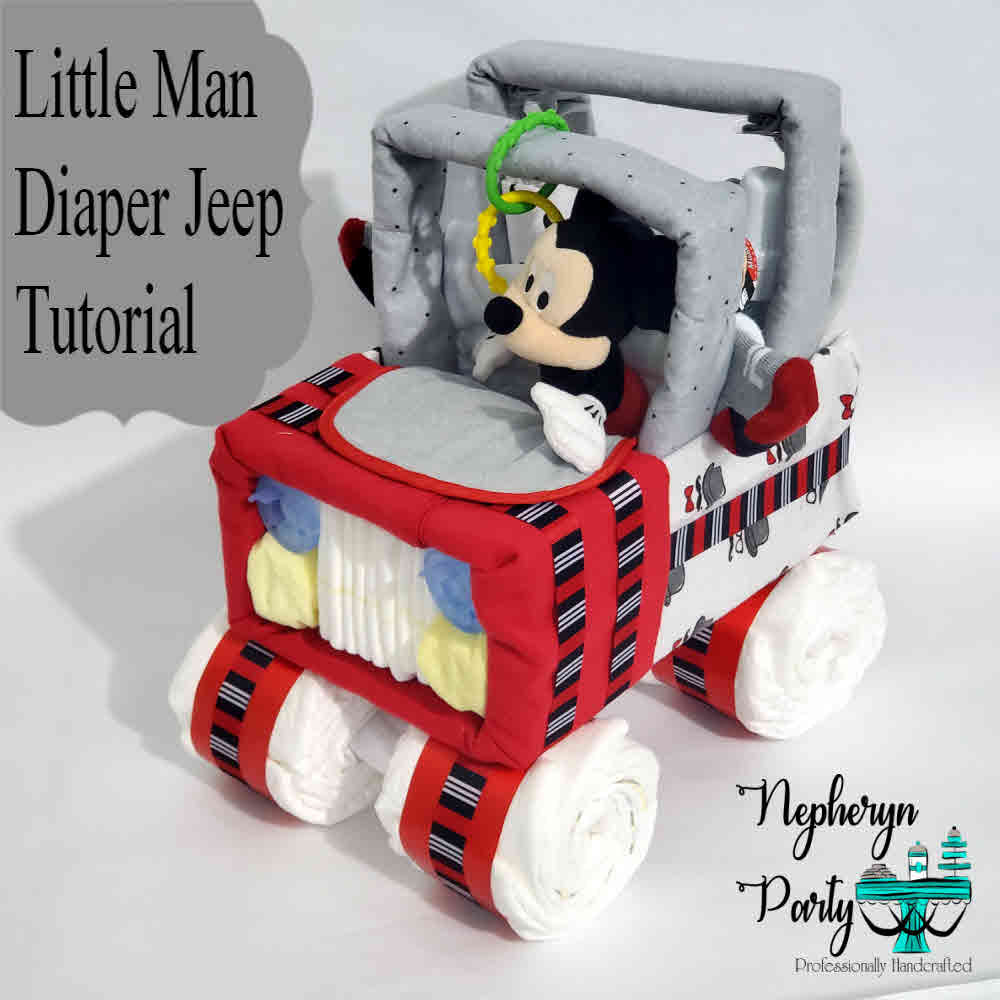
Image Source: nepherynparty.com
Gathering Your Jeep Components
Before we start rolling, let’s gather all the necessary supplies. Think of this as gathering parts for a real Jeep, but much more adorable!
Essential Supplies:
- Diapers: You’ll need a good quantity, typically between 40-70 newborn or size 1 diapers. The exact number depends on the size of your Jeep.
- Large Cardboard Base: A sturdy piece of cardboard, around 12×18 inches, will serve as the foundation for your Jeep.
- Small Cardboard Piece: For the windshield.
- Rubber Bands: Various sizes to secure rolled diapers.
- Wooden Skewers or Dowels: To connect different sections and add stability.
- Double-Sided Tape or Hot Glue Gun: For adhering various parts.
- Baby Blanket or Burp Cloth: To cover the cardboard base and add softness.
- Baby Washcloths or Small Towels: For the Jeep’s seats and other details.
- Baby Bottle (Optional): Can be used as the gear shift or headlights.
- Baby Socks or Small Toys: For the wheels or decorative elements.
- Baby Wipes Container (Optional): Can be used as a base for the hood.
- Baby Powder Container (Optional): For decorative elements.
- Baby Bottle Brush (Optional): Can be used for the steering wheel.
- Baby Lotion or Cream Container (Optional): For decorative accents.
- Baby Spoon or Fork (Optional): For decorative touches.
- Baby Rattle (Optional): For added fun and sound.
- Baby Pacifier (Optional): For headlights or decorations.
- Baby Bib (Optional): For added flair or to resemble a license plate.
- Baby Onesie or Baby Outfit: To drape over the Jeep or wrap around it.
- Baby Hat or Beanie: To place on the “driver.”
- Baby Booties or Baby Shoes: To place on the “driver.”
- Decorative Ribbons and Bows: To tie everything together and add color.
- Craft Paper or Cardstock: For cutting out shapes like headlights, taillights, and license plates.
- Scissors: For cutting.
- Markers: For drawing details.
Tools for Assembly:
- Scissors
- Hot Glue Gun (with adult supervision)
- Rubber Bands
- Wooden Skewers
Building the Diaper Jeep: Step-by-Step
Let’s get down to business and construct our adorable diaper Jeep! This is where your creativity shines.
Step 1: Preparing the Base
- Cover the Cardboard: Take your large cardboard base. Wrap it neatly with a baby blanket or burp cloth. Secure it with double-sided tape or a few strategically placed rubber bands around the edges. This creates a soft, visually appealing foundation for your Jeep.
Step 2: Crafting the Wheels
The wheels are crucial for any vehicle! For our diaper Jeep, we’ll make them from rolled diapers.
- Roll the Diapers: Take a diaper and lay it flat. Start rolling it tightly from the diaper’s open end (the end without the tabs) towards the closed end.
- Secure with a Rubber Band: Once rolled, secure the diaper with a rubber band around the middle. You want it snug but not so tight that it deforms the roll.
- Repeat for All Wheels: You’ll need four wheels. You can make them all the same size or slightly larger for the rear wheels if you prefer a more realistic look.
- Optional: Wheel Hubs: To make the wheels look more like actual wheels, you can place a smaller rolled diaper or a baby washcloth bunched up in the center of each large diaper roll before securing with the rubber band. Alternatively, you can use a small round object like a baby wipe container lid or a toilet paper tube cut to size.
Step 3: Constructing the Jeep Body
This is where the main structure of your Jeep comes to life.
- Form the Main Body: You’ll need a larger section for the main body of the Jeep. Roll several diapers tightly and secure them with rubber bands. You can arrange these rolled diapers in a rectangular or oval shape to form the base of your Jeep’s body. Use rubber bands to hold this cluster of rolled diapers together.
- Create the Hood: For the hood of the Jeep, you can use a slightly smaller cluster of rolled diapers or even a clean, empty baby wipes container (with the lid closed) wrapped in diapers or a burp cloth. Secure this to the front of the main body.
- Build the Truck Bed/Rear: The back of the Jeep can be formed by another cluster of rolled diapers, creating a small “bed” or the rear of the vehicle.
Step 4: Adding the Wheels to the Body
Now it’s time to attach the wheels.
- Position the Wheels: Place the four rolled diaper wheels onto your cardboard base, positioning them where the wheels would naturally be on a Jeep.
- Secure the Wheels:
- Method 1 (Skewers): Carefully push a wooden skewer through the center of each diaper wheel and then into the diaper body of the Jeep. Ensure the skewers are securely embedded. You might need to use multiple skewers for each wheel to keep them firmly attached.
- Method 2 (Double-Sided Tape/Glue): For a less invasive method, use strong double-sided tape or a hot glue gun (with adult supervision) to attach the sides of the diaper wheels to the main diaper body.
Step 5: Crafting the Windshield and Roof
- The Windshield: Take your small piece of cardboard. You can cover it with a baby washcloth or cut it into a rectangular shape and decorate it. Use double-sided tape or hot glue to attach it to the front of the Jeep’s body, behind the hood.
- The Roof: A soft baby blanket, a folded burp cloth, or even a larger baby washcloth can serve as the roof. Drape it over the windshield and the rear section. You can secure it with rubber bands or tie it gently with ribbons.
Step 6: Adding Decorative Details and Accessories
This is where your diaper Jeep truly becomes a masterpiece! Think of this as adding diaper accessories to enhance its appearance.
- Headlights: Use two baby washcloths rolled into small circles, two pacifiers, or two small round baby food containers wrapped in white paper. Attach them to the front of the Jeep using tape or glue. You can draw little yellow circles on craft paper for a more realistic look.
- Taillights: Similar to headlights, use red-dyed baby washcloths or red craft paper cut into small squares or circles and attach them to the rear of the Jeep.
- Grille: Cut strips of brown or black cardstock and glue them vertically onto the front of the Jeep to resemble a grille.
- Bumpers: Use rolled-up baby washcloths or white cardstock to create front and rear bumpers.
- Steering Wheel: A baby bottle brush or a small toy ring can be a great steering wheel. Attach it inside the Jeep.
- Gear Shift: A baby spoon or fork can be inserted to look like a gear shift.
- License Plate: Cut a small rectangle from cardstock and write “Baby on Board!” or the baby’s last name. Attach it to the rear of the Jeep.
- Exhaust Pipe: A small, rolled-up baby washcloth or a toilet paper tube painted black can be attached to the side or rear.
- Seats: Use folded baby washcloths or small rolled diapers to create seats inside the Jeep.
- Driver: Place a baby hat or beanie on the front, perhaps with a baby sock peeking out as a “foot.”
Step 7: Final Touches and Presentation
- Wrap and Tie: Gently wrap a baby onesie or a pretty ribbon around the entire creation to hold everything together and add a splash of color. Tie large bows.
- Add More Gifts: You can tuck additional small diaper accessories or gifts into the diaper Jeep, such as a small baby lotion, baby powder, or a baby shampoo bottle. A diaper bouquet can also be incorporated, with rolled diapers tied to skewers and arranged around the Jeep.
Variations and Creative Ideas
Don’t feel limited to just one design! Here are some ways to customize your diaper Jeep.
Customizing Your Diaper Jeep:
- Color Themes: Use diapers and ribbons that match a specific color scheme for the baby’s nursery or the baby shower theme.
- “Off-Road” Jeep: Add extra fluffy washcloths to make it look like it’s covered in mud or add small toy trees or animals around it.
- “Jeep Wrangler” Style: Focus on the iconic Jeep Wrangler look with a more defined grill and round headlights.
- Diaper Jeep Stroller: While a full diaper stroller is a different project, you can adapt the Jeep concept by adding a “handle” using cardboard tubes and blankets to give the impression of a stroller. This is a fun, more whimsical take.
- Diaper Tricycle: For a diaper tricycle, you’d focus on three wheels and a different frame structure, but the diaper-rolling technique is the same.
Tips for Success
Here are some pointers to make your diaper Jeep-building experience smooth and successful.
Making Your Diaper Jeep Shine:
- Neat Rolls: Roll your diapers tightly and evenly. This makes the final structure more stable and visually appealing.
- Secure Fastenings: Make sure all rubber bands are secure and tape/glue is applied firmly. You don’t want your Jeep falling apart!
- Balance is Key: Distribute the weight of the rolled diapers evenly to prevent your Jeep from tipping.
- Cleanliness First: Ensure all items used are clean and new, as they are intended for a baby.
- Personalize It: Add the baby’s name or initials if known. This makes the gift even more special.
Frequently Asked Questions (FAQ)
Here are some common questions people have when making a diaper Jeep.
What size diapers should I use?
Newborn or Size 1 diapers are typically best for diaper cakes and vehicles as they are smaller and easier to roll tightly. However, you can use larger sizes if you want a bigger Jeep.
How many diapers do I need?
You’ll generally need between 40-70 diapers, depending on the size of the Jeep you want to create.
How do I secure the diapers without them unrolling?
Rubber bands are the most common and effective way to keep diapers rolled. You can also use ribbon or string for a more decorative touch, but rubber bands provide better security.
Can I use other baby items in the diaper Jeep?
Absolutely! This is a great way to incorporate other essentials like washcloths, burp cloths, baby socks, pacifiers, bottles, and small toys.
How long does it take to make a diaper Jeep?
With all your supplies gathered, it typically takes 1-3 hours to assemble a diaper Jeep, depending on your crafting speed and the complexity of your design.
Is this a good baby shower gift?
Yes, a diaper Jeep is an excellent and very popular baby shower gift! It’s practical, creative, and a memorable centerpiece that the parents-to-be will love. It’s a fantastic alternative to a traditional diaper stroller or diaper car if you want something more unique.
How can I transport a diaper Jeep to a shower?
If you need to transport it a distance, place it in a sturdy box or a large bag. You might want to reinforce the base with extra cardboard or bubble wrap to ensure it stays intact during transit.
What other diaper creations can I make?
Besides a diaper Jeep, you can create diaper cakes, diaper strollers, diaper motorcycles, diaper tricycles, and diaper bouquets. The possibilities are endless for DIY diaper crafts!
Making a diaper Jeep is a rewarding project that combines creativity with practicality. It’s a heartfelt gesture that shows you’ve put extra thought and effort into a gift for the new parents and their little one. Have fun building your adorable diaper vehicle!