
What is a Jeep diaper cake? A Jeep diaper cake is a creative and practical baby shower gift made from rolled diapers, shaped and decorated to resemble a Jeep. Can I make one as a centerpiece? Absolutely! It makes a fantastic centerpiece for a Jeep baby shower theme. Who is it for? It’s perfect for any parent-to-be, especially those who love the outdoors or have a passion for Jeeps, and it’s a wonderful way to present a practical gift.
Are you planning a baby shower for a Jeep-loving parent-to-be? Or perhaps you’re looking for a unique baby shower gift that’s both adorable and incredibly useful? Look no further than the DIY Jeep diaper cake! This one-of-a-kind creation is a showstopper, a conversation starter, and a treasure trove of essential baby items. Forget those boring, store-bought gifts; this is how you make a statement and show your thoughtful side.
Creating a diaper cake might seem daunting, but it’s surprisingly simple with the right guidance. We’ll walk you through every step to craft a charming Jeep theme baby gift that will be cherished by the new parents. This isn’t just a diaper cake; it’s a baby Jeep centerpiece that embodies adventure and new beginnings.
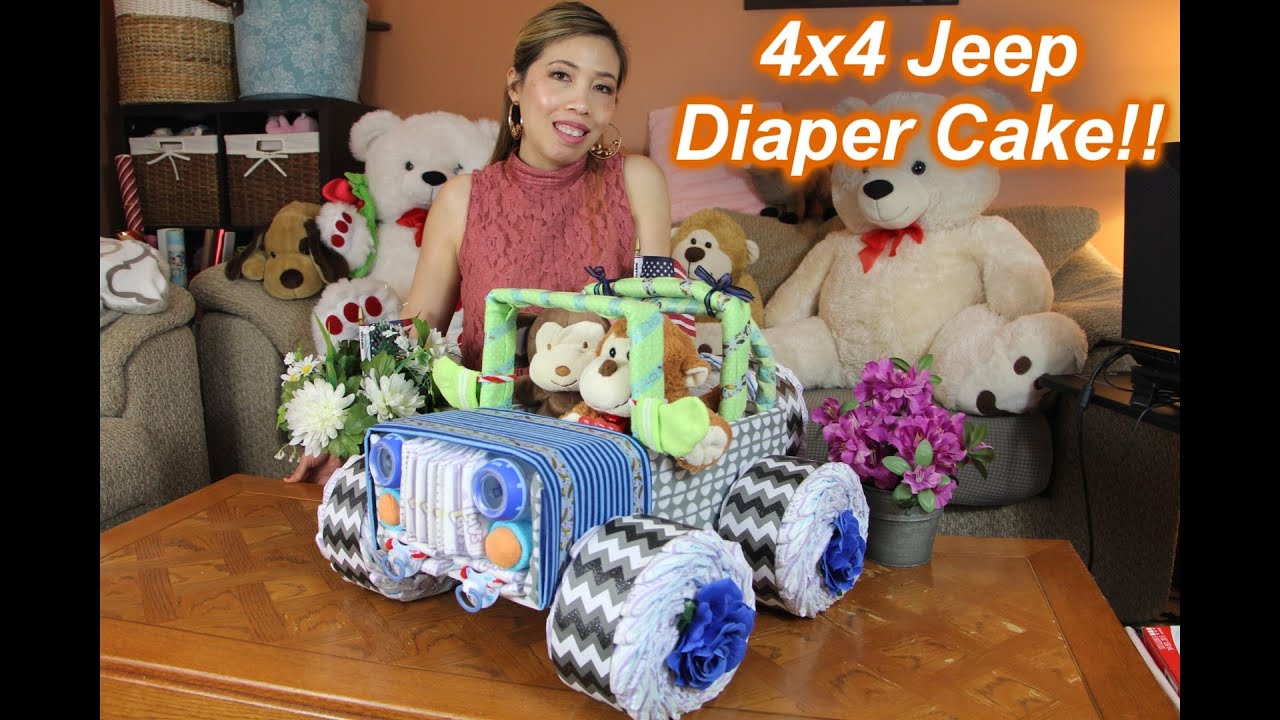
Image Source: i.ytimg.com
Why Choose a Jeep Diaper Cake?
In a sea of traditional gifts, a Jeep diaper cake stands out. Here’s why it’s a fantastic choice for any baby shower:
- Uniquely Themed: If the parents-to-be love Jeeps or the great outdoors, this gift is a perfect fit. It shows you’ve put extra thought into their interests.
- Practicality Meets Cuteness: It’s made of diapers, which every new parent needs in bulk! But it’s assembled in a way that’s far more exciting than a simple pack of diapers.
- Memorable Centerpiece: This isn’t just a gift to be unwrapped and put away. It can be the star of the baby shower decor, acting as a charming baby Jeep centerpiece for the main table.
- Customizable: You can tailor the colors, accessories, and even the type of Jeep to match the parents’ preferences or the baby’s nursery theme.
- DIY Satisfaction: There’s immense pride in creating something beautiful and functional with your own hands. It adds a personal touch that mass-produced gifts can’t match.
While we’re focusing on a Jeep, the principles of how to build a diaper cake can be adapted for other vehicle themes, like a Jeep stroller cake or even a Jeep wagon cake, giving you versatile baby shower diaper cake ideas.
Gathering Your Jeep Diaper Cake Supplies
Before we dive into the construction, let’s assemble your toolkit. Having everything ready makes the process smooth and enjoyable.
Essential Diaper Cake Components:
- Diapers: The core of your creation!
- Quantity: You’ll typically need between 40-70 diapers, depending on the size of your cake tiers. Newborn or size 1 diapers are usually best for a standard size cake.
- Type: Disposable diapers are easiest to work with. You can use cloth diapers, but they require different rolling and securing methods.
- Cardboard Base: A sturdy base to build upon.
- Options: A thick cardboard circle (around 10-12 inches in diameter) or a cake board works perfectly. You can also repurpose a clean pizza box lid.
- Center Support (Optional but Recommended): For stability, especially for larger cakes.
- Material: A cardboard tube (like from paper towels or wrapping paper) or a sturdy plastic bottle can be used.
- Securing Materials:
- Rubber Bands: Various sizes are needed to hold diaper rolls together and to secure the tiers.
- Ribbon or Twine: For securing tiers and for decoration.
- Double-Sided Tape or Hot Glue Gun (with adult supervision): For attaching decorations. Use sparingly on diapers to avoid damage.
Jeep-Specific Decorations:
These are what transform a regular diaper cake into a Jeep theme baby gift.
- Jeep Body:
- Wheels: You can use actual toy Jeep wheels (if you have a spare or can buy them), cardstock cutouts, or even round baby toys like teething rings.
- Headlights: Small round buttons, stickers, or even small yellow baby toys.
- Grille: Cardstock cutout or felt.
- Windshield: Clear cellophane or a printed image of a windshield.
- Bumpers: Can be made from rolled cardstock or ribbon.
- Jeep Accessories:
- Baby Bottles: Can be used as headlights or decorative elements.
- Baby Washcloths or Small Blankets: Can be shaped to resemble car seats or luggage.
- Baby Socks or Mittens: Can be used as spare tires or decorative accents.
- Baby Toys: Small plush toys, rattles, or teething toys that fit the theme.
- Baby Care Items: Pacifiers, baby lotion bottles, or baby wash can be incorporated as decorative features.
- Decorative Ribbons and Bows: In colors that match your Jeep theme (e.g., army green, brown, blue, red).
- Optional Embellishments: Small toy animals (like safari animals), baby rattles that look like steering wheels, or small plastic trees for an outdoor adventure feel.
Tools:
- Scissors: For cutting ribbon, cardstock, and tape.
- Craft Knife (Optional): For precise cutting of cardstock.
- Ruler: For measuring.
Step-by-Step Guide: Crafting Your Jeep Diaper Cake
Let’s get building! This guide will break down the process into manageable steps.
Step 1: Prepare Your Diapers
The foundation of any diaper cake is the diapers themselves.
- Unfold and Re-roll: Gently unroll each diaper. Then, re-roll it tightly, starting from the end with the tabs. Ensure the rolled diaper is snug and secure.
- Secure the Roll: Wrap a small rubber band around the center of each rolled diaper to keep it from unfurling. You want the rolled diapers to be consistent in size and tightness for a neat appearance.
Step 2: Construct the Base Tier (The Main Body)
This is the largest section of your Jeep.
- Arrange Diaper Rolls: Take your rolled diapers and arrange them in a circle on your cardboard base or cake board. The rubber-banded side should be facing outward.
- Create the Circle: Continue adding rolled diapers, fitting them snugly against each other, until you have a solid circle. The number of diapers will depend on their size and how tightly you pack them. Aim for a diameter that feels substantial.
- Secure the First Tier: Once you have a complete circle, wrap a large rubber band around the outside of the diaper circle to hold them all together. Gently adjust the diapers to ensure they are even.
- Add a Ribbon (Optional): For a cleaner look and extra security, you can wrap a decorative ribbon around the secured tier and tie it in a bow or knot at the back.
Step 3: Build the Second Tier (The Cabin/Hood)
This tier will be slightly smaller than the base.
- Repeat the Rolling Process: Roll more diapers as you did in Step 1.
- Create a Smaller Circle: Arrange these rolled diapers in a circle on your base tier. The diameter of this circle should be smaller than the first tier, creating a tiered effect. You might need fewer diapers for this tier.
- Secure the Second Tier: Wrap a rubber band around this smaller circle of diapers to hold them together.
Step 4: Add the Third Tier (Optional – The Roof/Headrest)
If you want a taller cake, you can add a third, even smaller tier.
- Roll More Diapers: Prepare another set of rolled diapers.
- Form a Compact Circle: Create a smaller circle with these diapers.
- Secure: Use a rubber band to hold this smallest tier together.
Step 5: Assemble the Tiers
Now it’s time to bring your cake together.
- Center the Tiers: Place the second tier in the center of the base tier. If you’re using a third tier, place it on top of the second. Ensure they are centered to maintain balance.
- Add Center Support (If Used): If you decided to use a center support tube, slide it through the middle of all the tiers before placing the top tier. This adds significant stability, especially if you plan to transport the cake.
- Secure Tiers Together (Optional): You can use long ribbon ties or even strategically placed skewers (with the pointy ends removed or covered) to connect the tiers. Ribbon is generally safer and more visually appealing. Wrap a ribbon around the entire cake, going through the tiers, and tie it off securely.
Step 6: Transform Your Diaper Cake into a Jeep!
This is where the magic happens. Time to add those Jeep cake decorations.
Creating the Jeep Shape:
- The Base: Your first tier is the main body of the Jeep.
- The Cabin/Hood: Your second tier can represent the cabin. You can slightly offset it forward to create a hood effect.
- Wheels: Attach your chosen wheels to the sides of the base tier. You can use double-sided tape or small rubber bands. If using cardstock cutouts, tape or glue them on.
Adding Jeep Details:
- Headlights: Stick two round buttons or small yellow toys onto the front of the second tier, just above the base tier, to simulate headlights.
- Grille: Cut a simple grille shape from black or gray cardstock and attach it between the headlights.
- Windshield: You can create a simple frame from cardstock and attach a piece of clear cellophane or a printed windshield graphic to it. Then, secure this to the front of the second tier.
- Bumpers: Use ribbon or rolled cardstock to create front and rear bumpers. Secure with double-sided tape or a dab of hot glue.
- Spare Tire: Attach a small rolled diaper (secured with a rubber band) to the back of the base tier, perhaps with a small ribbon bow. Alternatively, use a baby sock or mitten.
- Body Details: Use colorful ribbons to wrap around the tiers, mimicking the Jeep’s body lines or creating a decorative trim. Tie bows strategically.
- Finishing Touches: Add any other chosen baby care items or toys. A baby bottle can be placed on top like a hood ornament, or a small plush animal can sit on the “driver’s seat.”
Tip for Attaching Decorations: Always test adhesives on a spare diaper first to ensure they don’t damage or rip the material. Double-sided tape is usually the safest bet.
Step 7: Presentation
Your Jeep diaper cake is almost ready!
- Secure Decorations: Double-check that all decorations are firmly attached.
- Wrap (Optional): If you need to transport the cake, you can loosely wrap it in cellophane. Secure the cellophane with ribbon at the base.
- Add a Gift Tag: Personalize it with a custom gift tag that matches the Jeep theme.
Tips for Success and Variations
Making a diaper cake is an art, and practice makes perfect! Here are some extra tips and ideas to elevate your creation.
Enhancing the Jeep Theme:
- Color Palette: Stick to classic Jeep colors like army green, khaki, brown, black, or even a bold red or blue. Coordinate your ribbons and decorations with these colors.
- Outdoor Adventure Vibe: Add small toy animals (like a bear or a squirrel), miniature trees made from felt or cardstock, or even a tiny tent made from fabric to give it an adventurous feel.
- “Off-Road” Touches: Use brown ribbon to simulate mud splatters, or add small twigs and leaves (ensure they are clean and safe) around the base.
- Personalization: If you know the baby’s name, consider adding letter blocks or a personalized banner to the cake.
Alternative Diaper Cake Structures:
- The Jeep Stroller Cake: Instead of a traditional cake shape, arrange diapers to mimic a stroller. You might need a wider base and shorter tiers. Add stroller-like handles using rolled cardstock or ribbon. This is a unique take on baby shower diaper cake ideas.
- The Jeep Wagon Cake: Similar to the stroller, diapers can be arranged to form a wagon shape. Add wagon wheels and a handle. This is another charming variation for a Jeep theme baby gift.
Ensuring Stability:
- Center Rod: For cakes with more than two tiers, a central support rod (a paper towel tube or PVC pipe cut to size) is highly recommended. Insert it through the center of all tiers before stacking.
- Rubber Band Tightness: Make sure your rubber bands are snug but not so tight that they tear the diapers.
- Weight Distribution: Try to distribute the weight of decorations evenly across the cake.
What to Include in Your Diaper Cake Kit:
Beyond the basic diapers, consider adding these practical items within or around the cake:
- Baby Onesies: Roll them up and tuck them between the diaper rolls.
- Baby Blankets: Can be used as decorative wraps or tucked in.
- Baby Washcloths or Bibs: Roll these up like small diapers and add them to the tiers.
- Baby Socks and Mittens: Perfect for adding small details or spare tires.
- Pacifiers or Small Rattles: Can be attached as decorative elements.
- Baby Bottle: Can be used as a headlight or a decorative topper.
Frequently Asked Questions (FAQ)
Q1: How many diapers do I need for a Jeep diaper cake?
A1: Typically, you’ll need between 40 to 70 diapers, depending on the size of the diapers (Newborn or Size 1 are common) and how compactly you roll and arrange them.
Q2: Can I use a hot glue gun to attach decorations?
A2: Yes, but use it sparingly and on the decorations themselves, not directly on the diapers, to avoid melting or damaging them. Double-sided tape is often a safer alternative for attaching items directly to the diapers.
Q3: How do I make the Jeep shape really stand out?
A3: Focus on key Jeep features: prominent wheels, a distinct grille, headlights, and a windshield. Using different sized tiers can also help create the illusion of a vehicle’s body. Consider adding a spare tire to the back.
Q4: What if I don’t have a Jeep toy to use for decoration?
A4: You can easily create Jeep elements using cardstock or craft foam. Cut out circles for wheels, rectangles for headlights, and a grille shape. You can also find printable Jeep images online to cut out and use.
Q5: How do I transport a diaper cake?
A5: For short distances, you can place it in a large box. For longer trips, loosely cover it with cellophane and tie it with ribbon at the base. Avoid wrapping it too tightly, as this can crush the diapers. Drive carefully!
Q6: Can I make a diaper cake for a baby girl with a Jeep theme?
A6: Absolutely! You can use pink or purple ribbons, add floral accents, or choose a pastel-colored Jeep. The theme is versatile enough for any gender.
Creating a DIY Jeep diaper cake is a rewarding project that results in a memorable and incredibly useful gift. It’s a perfect way to celebrate the upcoming arrival of a little one with a touch of adventure and a whole lot of love. So gather your supplies, put on some music, and enjoy the process of building this adorable Jeep theme baby gift! It’s one of the most thoughtful baby shower diaper cake ideas out there.